
Intro
This article describes an example process of registering an asset, handling a breakdown work order and having it repaired, creating a follow-up work order for an overhaul, and ultimately taking an asset out of service after it has proven impossible to repair in McMain Online.
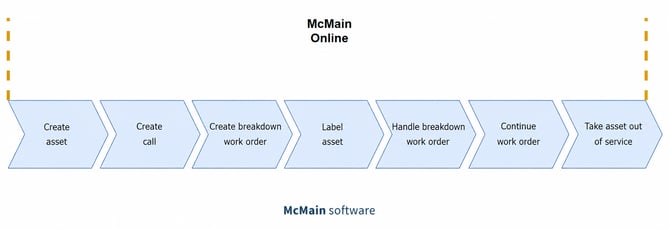
The image below provides a logical overview of this process and the various applications involved. It is assumed that the environment has already been populated with data such as employees, assets, items, and suppliers. Steps 1 through 7 are covered in this article.
Image 1: Life-cycle of an asset
Topics in this article
- Intro
- Step 1: Create and activate a new Asset
- Step 2: Create a Call for damage
- Step 3: Create a Breakdown Work Order from a Call
- Step 4: Mark the Asset with a Label
- Step 5: Handle the Breakdown Work Order
- Step 6: Follow-up Work Order
- Step 7: Take the Asset out of service
Step 1: Create and activate a new Asset
Our example company recently purchased an old DAF YA-4442 truck. It will be used for small shows and similar events and is therefore still roadworthy. To create the truck as an asset in McMain Online, go to the All assets menu and click the orange action button in the bottom-right corner. Then enter the details of the truck.
Image 2: Creating an asset in the 'All assets' screen
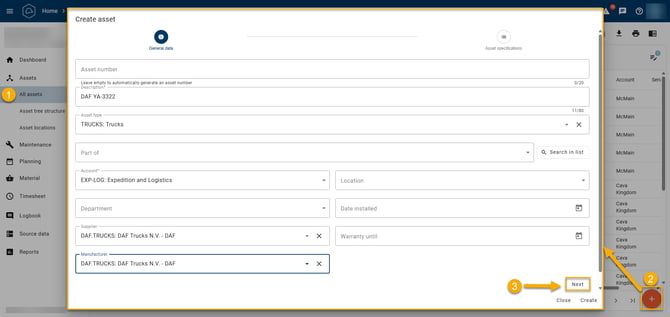
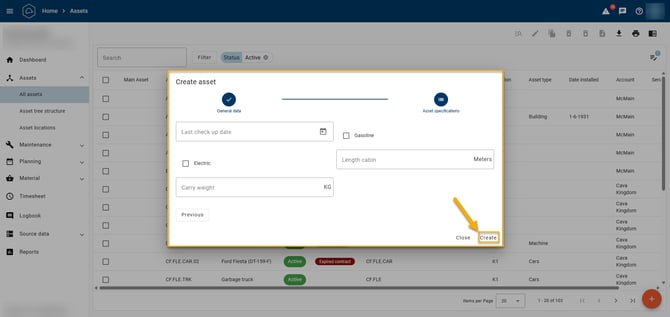
Since we know that this is a truck, and our example company already has several of these under the Asset type, click Next to assign the Asset specifications associated with this Asset type.
Image 3: Add Asset Specifications to an Asset
Step 2: Create a Call for damage
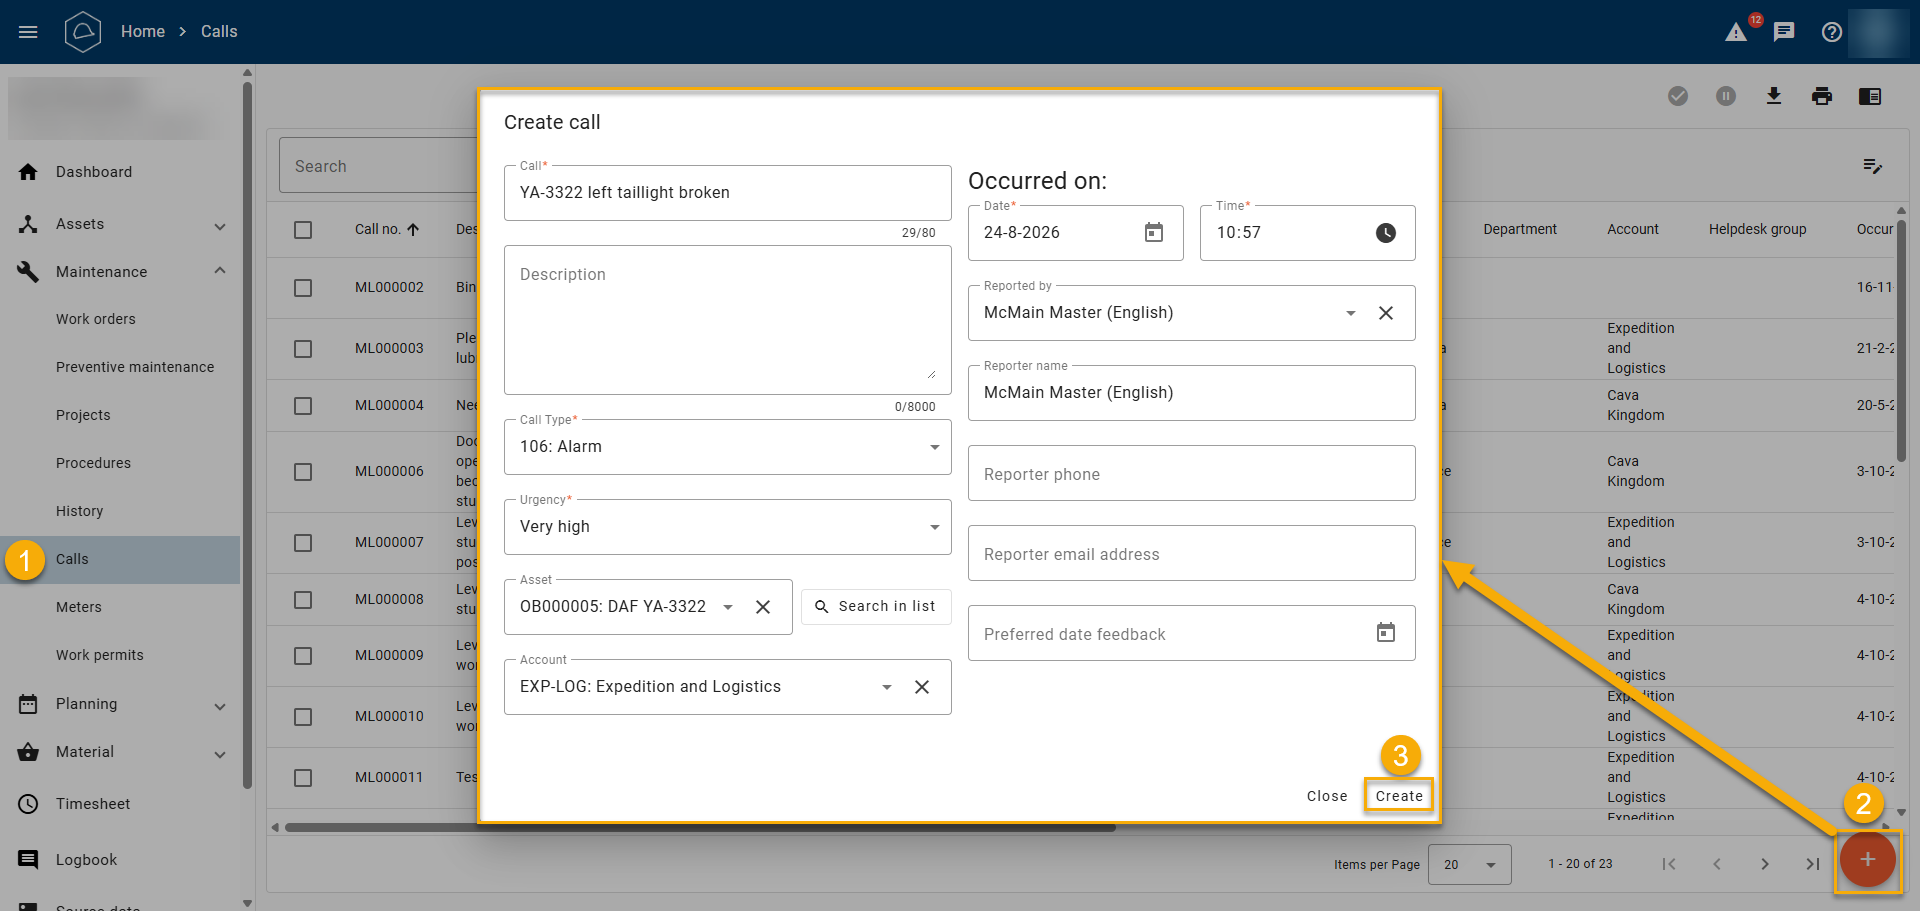
Our DAF has been in use for some time, but unfortunately sustained some damage to the front after a show. It no longer steers very well and has therefore been declared unsafe to drive. We will create a Call for this while the DAF is being returned for repairs.
Go to Maintenance -> Calls and click the action button in the bottom-right corner.
Image 4: Create a Call on the 'Calls' page
Step 3: Create a Breakdown Work Order from a Call
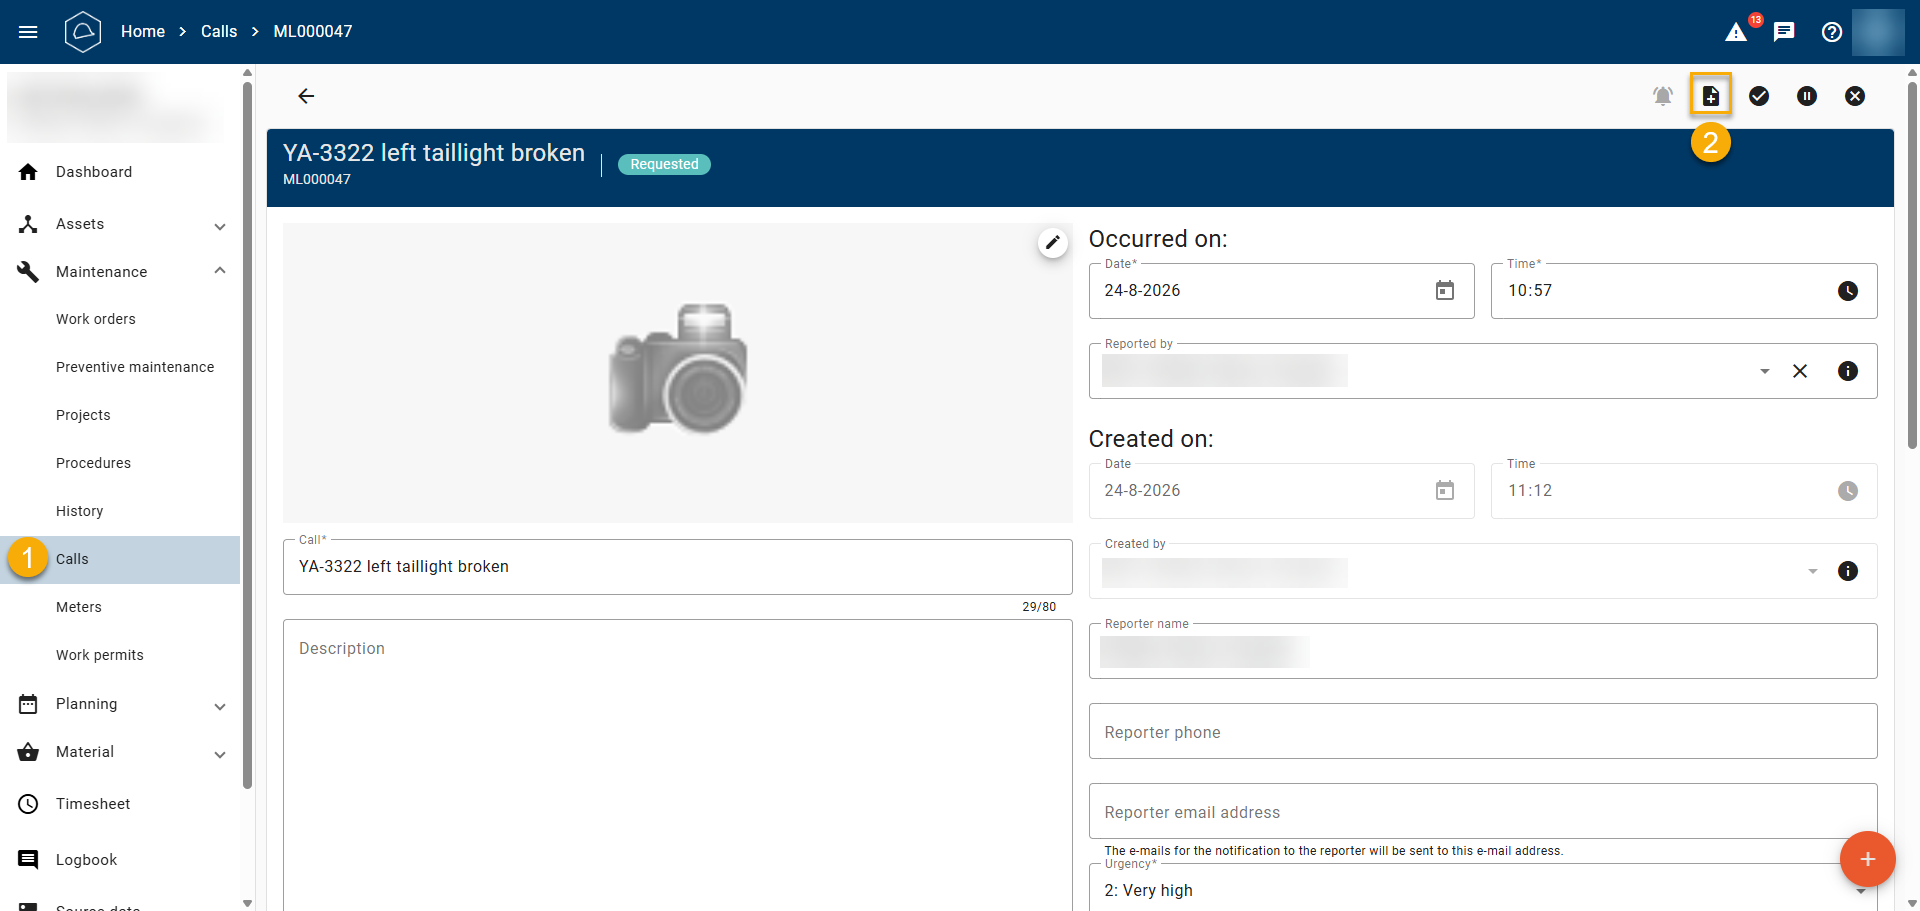
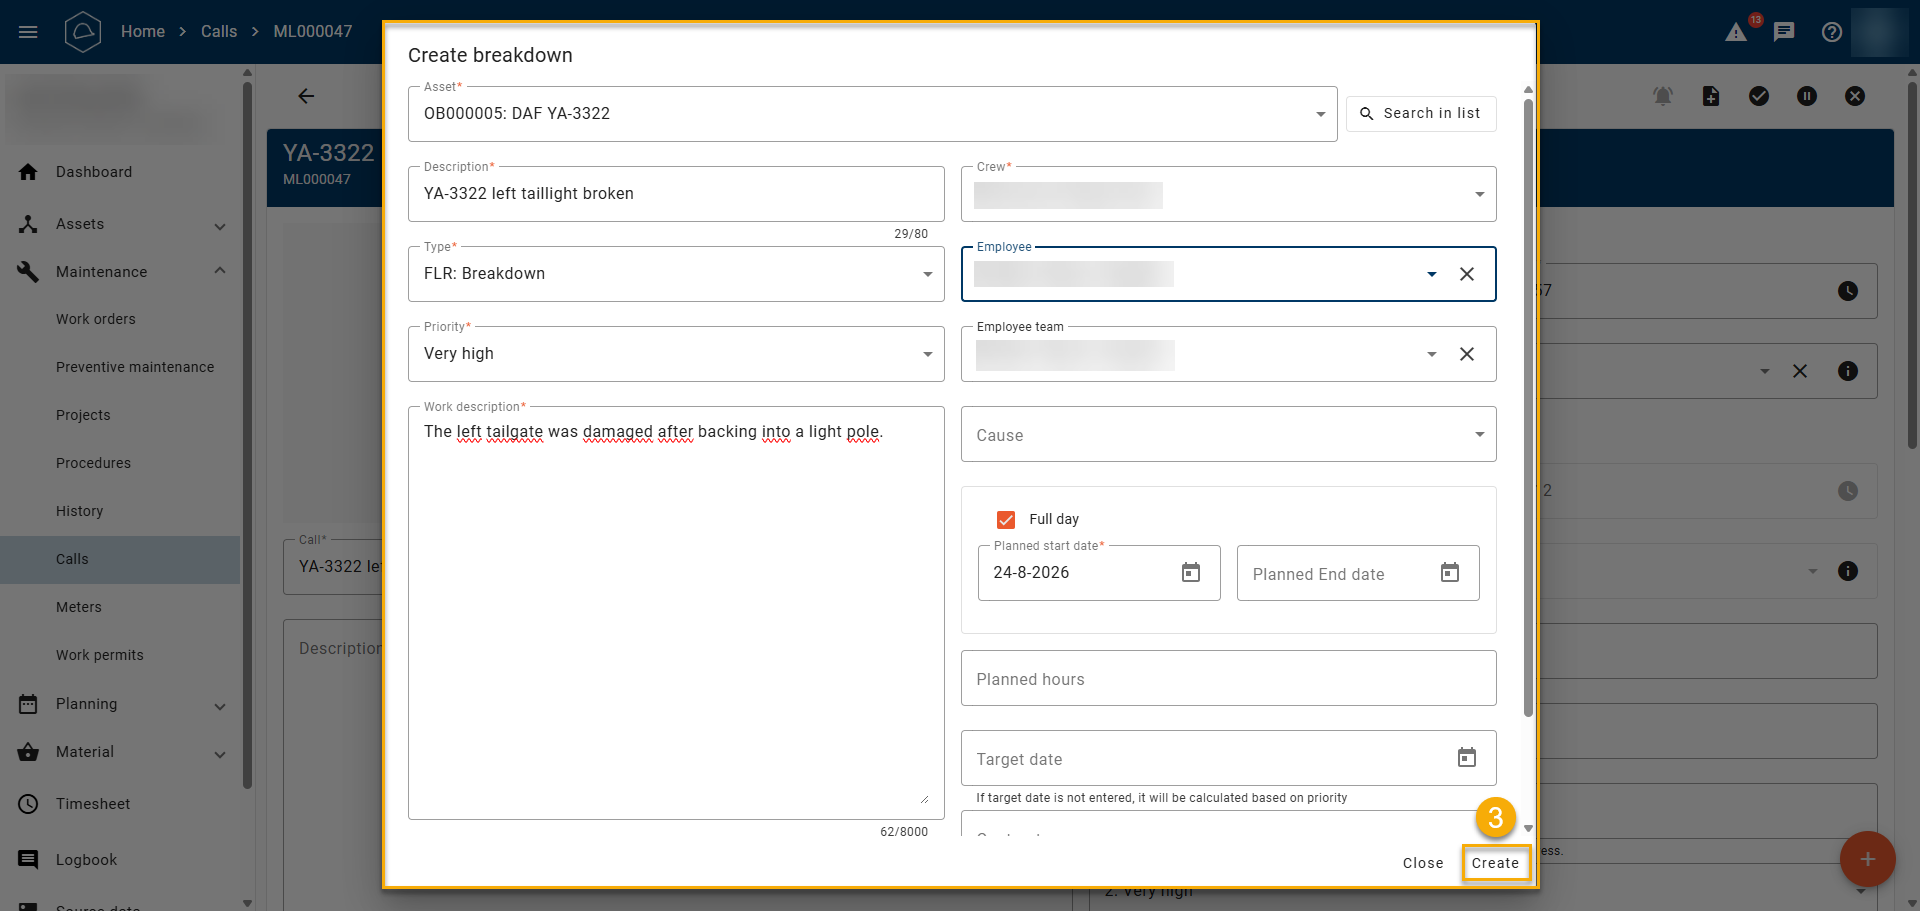
Thanks to the call, the DAF could be inspected promptly after it was returned to the garage. Significant damage to the front axle was found, which cannot be repaired immediately. Something needs to be done about it, however, because the truck is scheduled to attend another show at the end of the week. We will create a breakdown work order from this call via Maintenance > Calls and open the relevant call.
Click Work orders at the bottom of the screen, then click the orange action button in the bottom-right corner to register the breakdown work order.
Image 5: Create a Breakdown Work Order from a Call on the 'Calls' page
Step 4: Mark the Asset with a Label
Since the DAF is not roadworthy and is sometimes taken out for other purposes, it is important to clearly mark it so that it is not accidentally scheduled for use. We can do this using a label. This label is displayed with the asset in the system, immediately making its status clear.
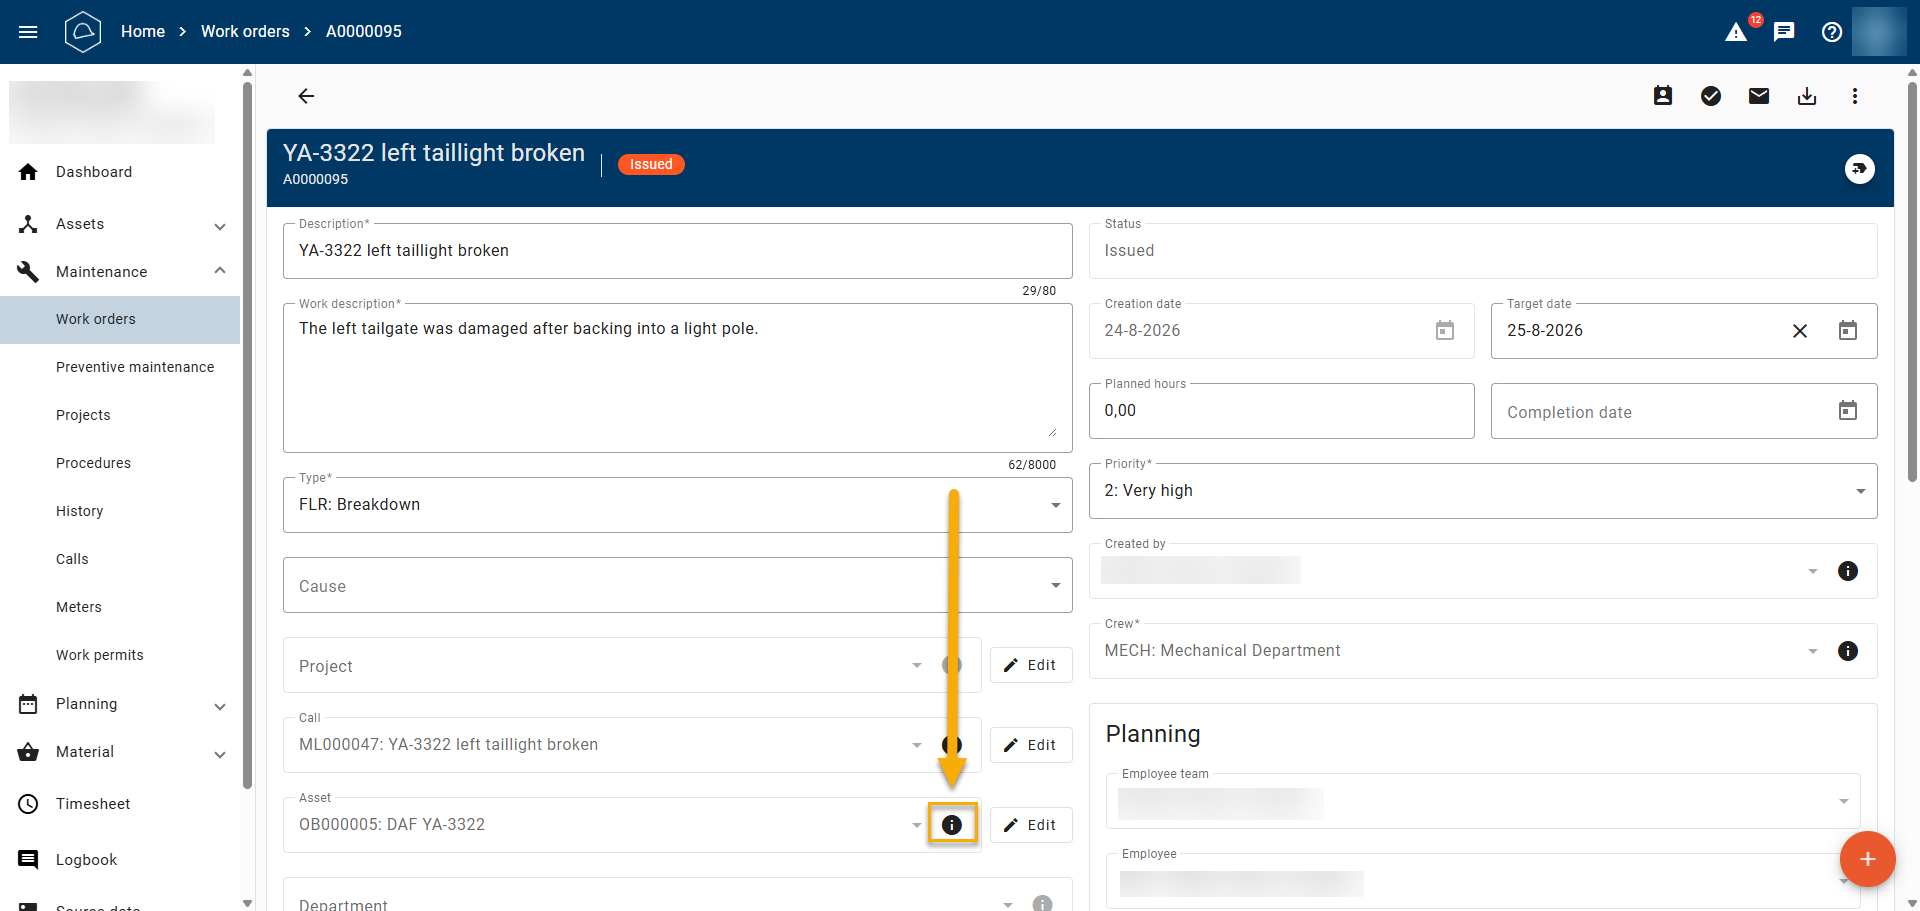
If we have just created the breakdown work order, we can use the black info button on the work order to navigate directly to the DAF Asset. Alternatively, we can access it through the Assets menu.
Image 6: Use the black info button for navigation
Once there, go to the label icon in the top-right corner and click Adjust Labels.
Image 7: Set a Label on an Asset
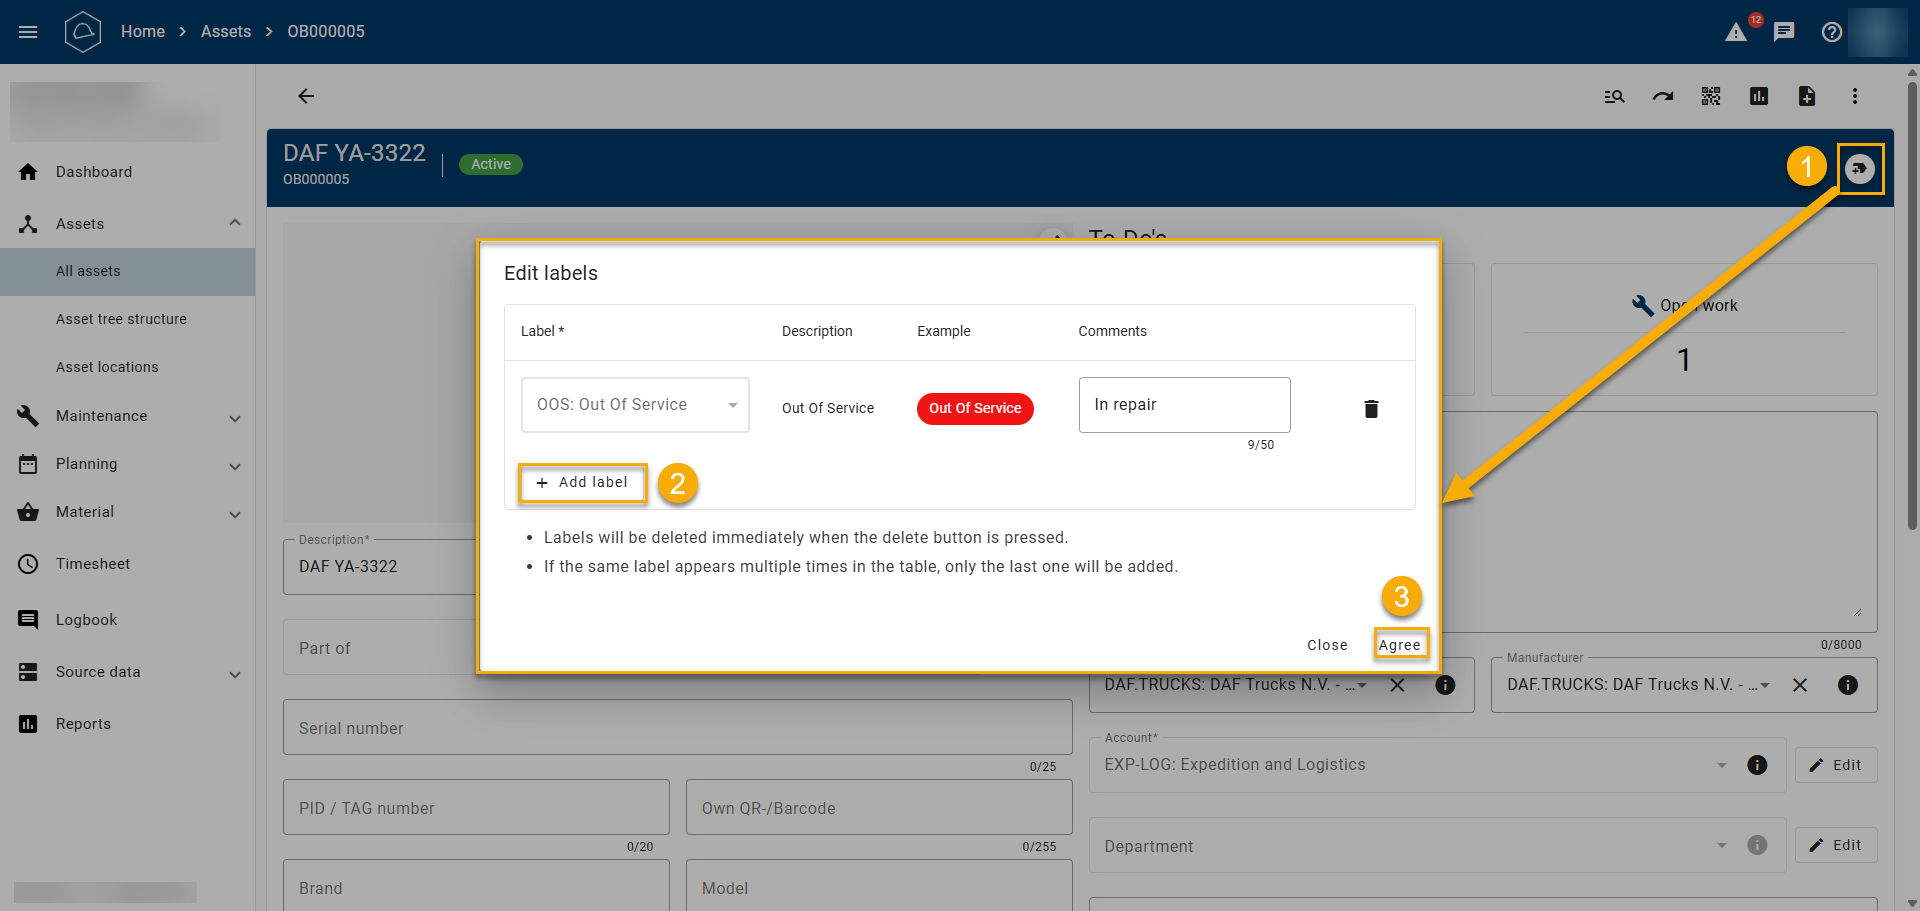
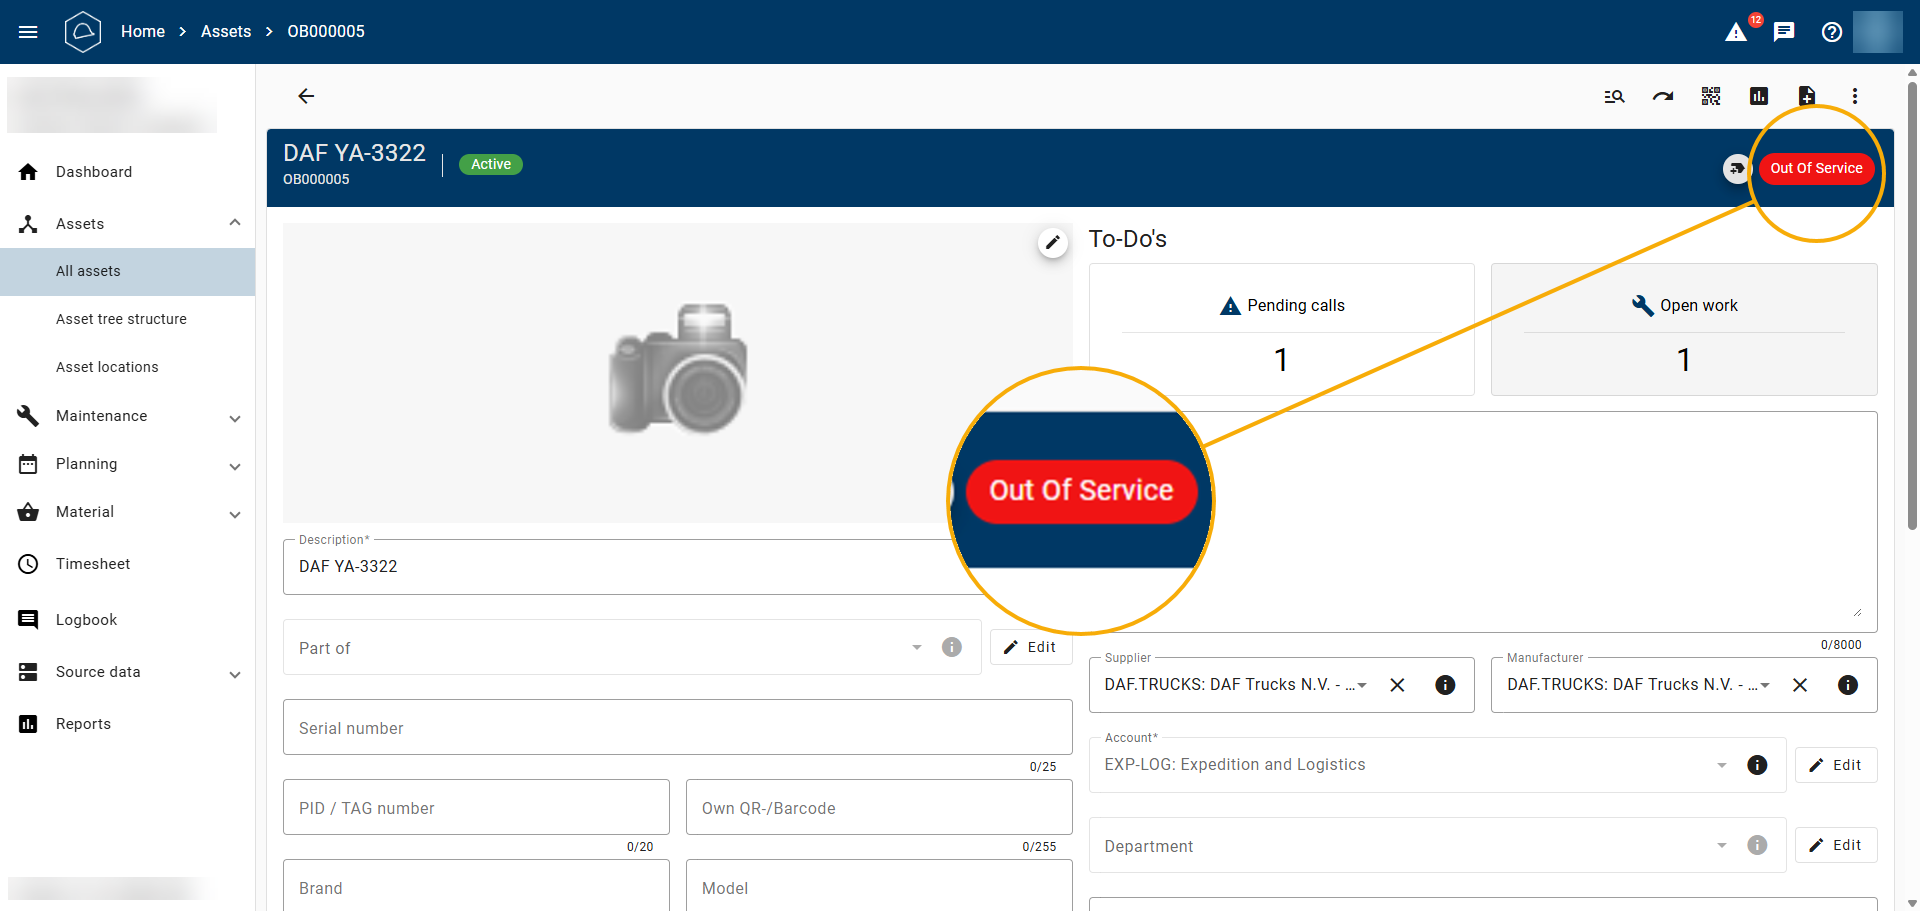
Add the correct label, add a comment if required, and click OK to apply it. The asset will now be clearly marked as out of service.
Image 8: An image of the Asset in the 'Asset list' page with the label
Step 5: Handle the Breakdown Work Order
We are not finished yet. Damage to the DAF has been identified and we know which component is damaged, but action is still required. Since we have the required parts in stock, we can use an item issue. Scroll down on the DAF work order and go to Material. Click the orange action button in the bottom-right corner.
Image 10: Select an item issue
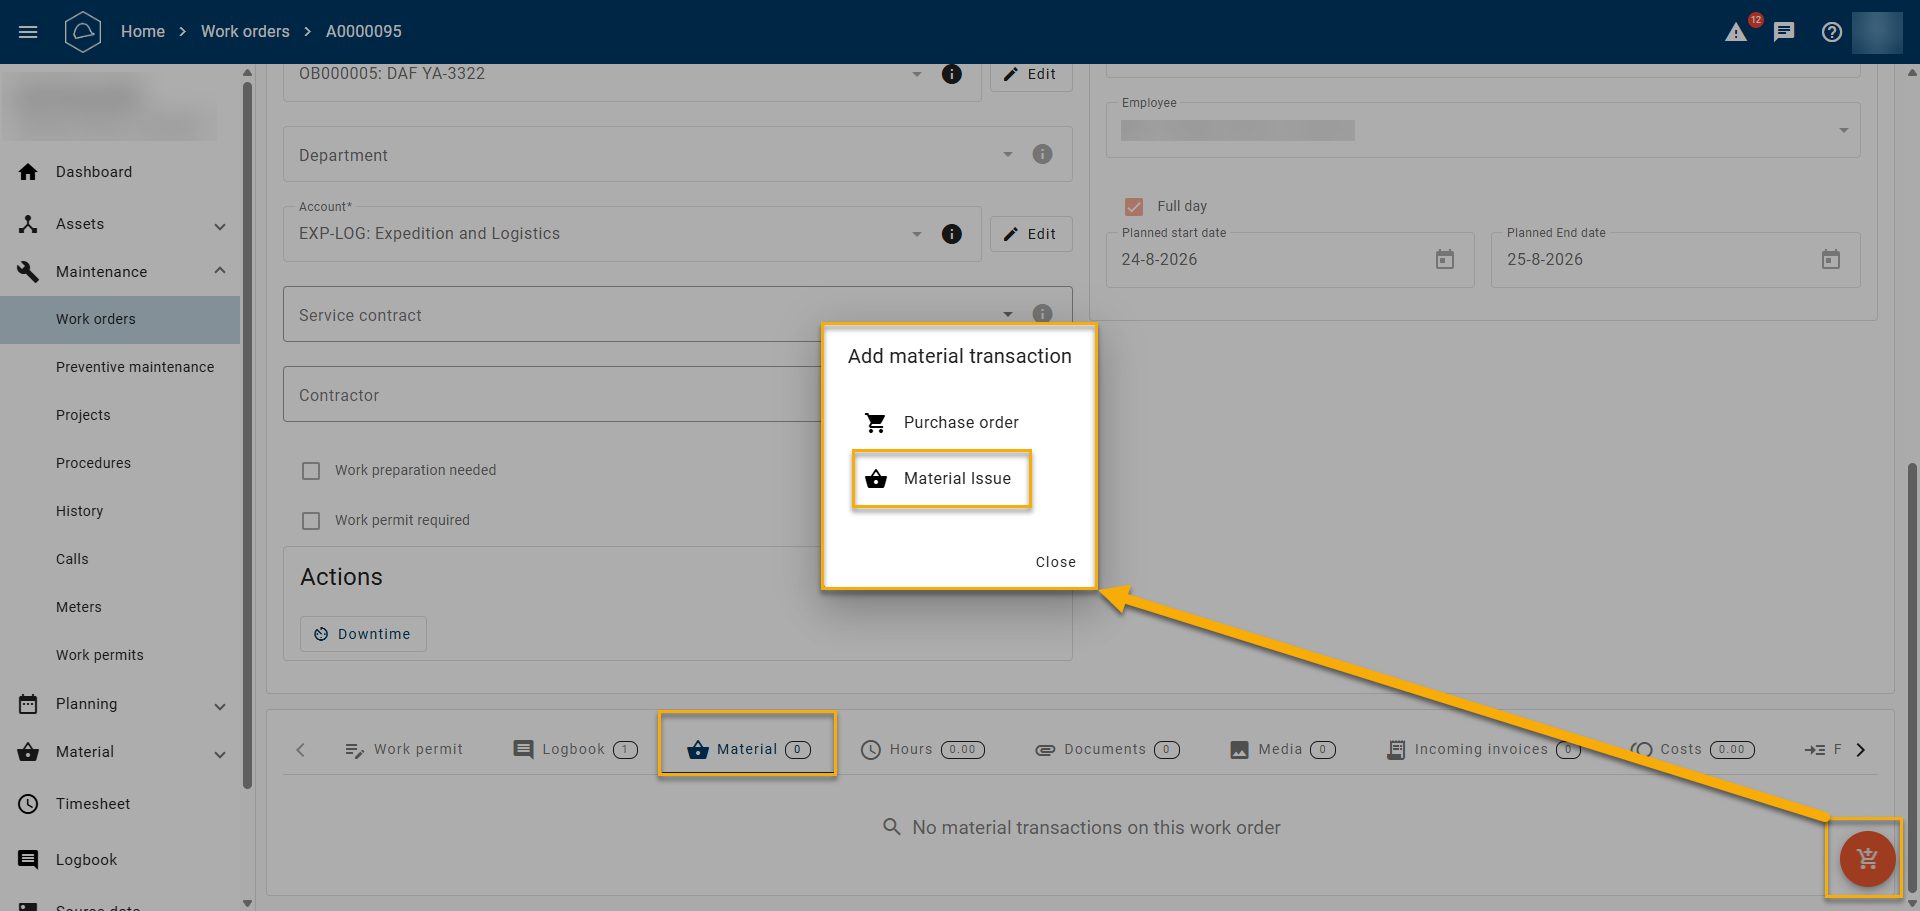
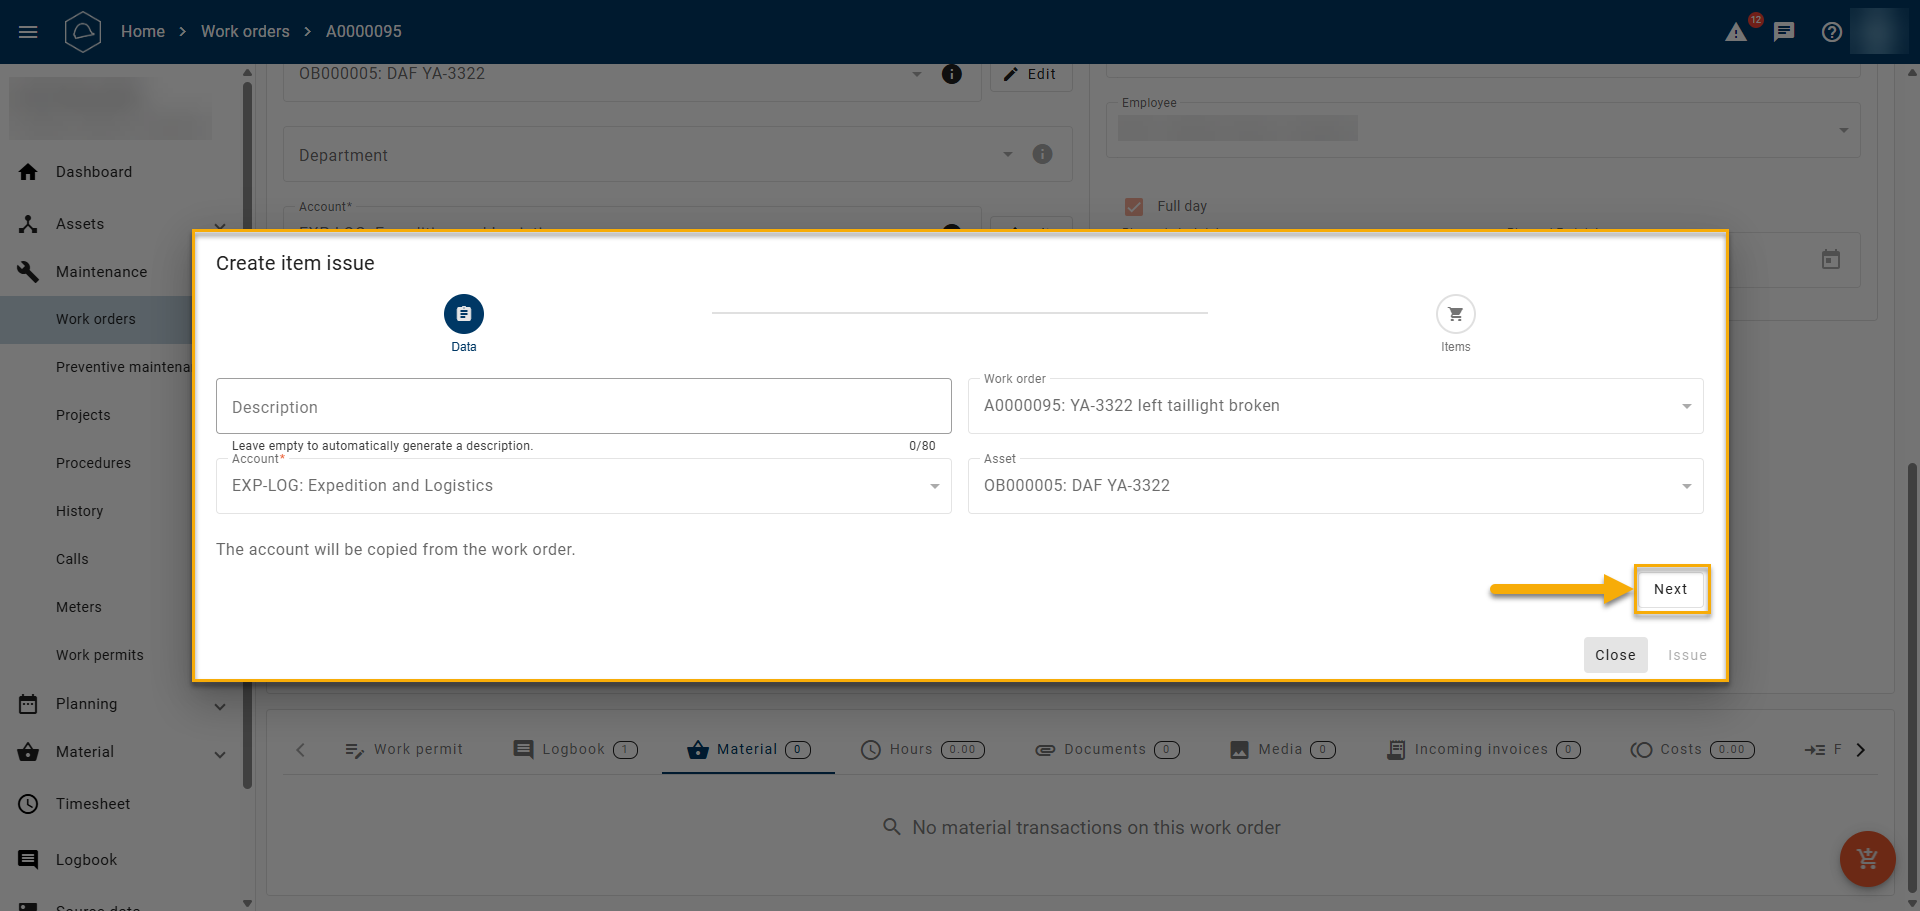
Image 10: Create an Item issue
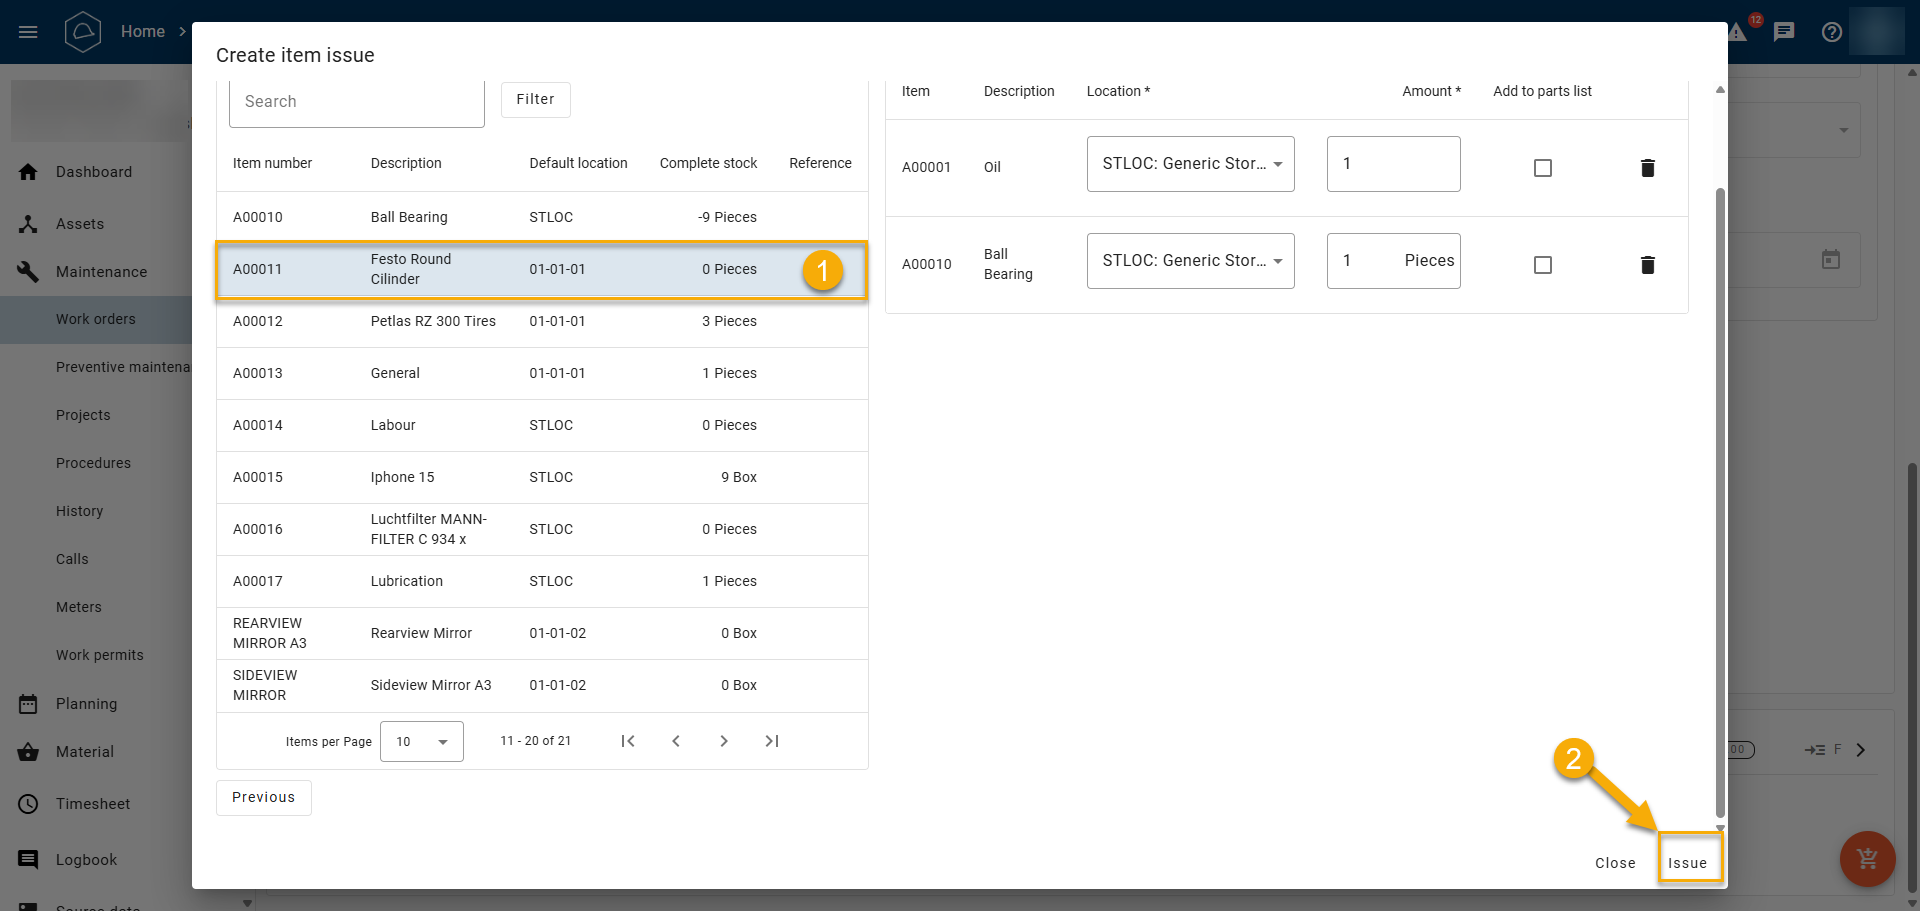
We need a bearing and some lubricating oil, so we add these and then click Issue.
Image 11: Complete an Item issue with Items
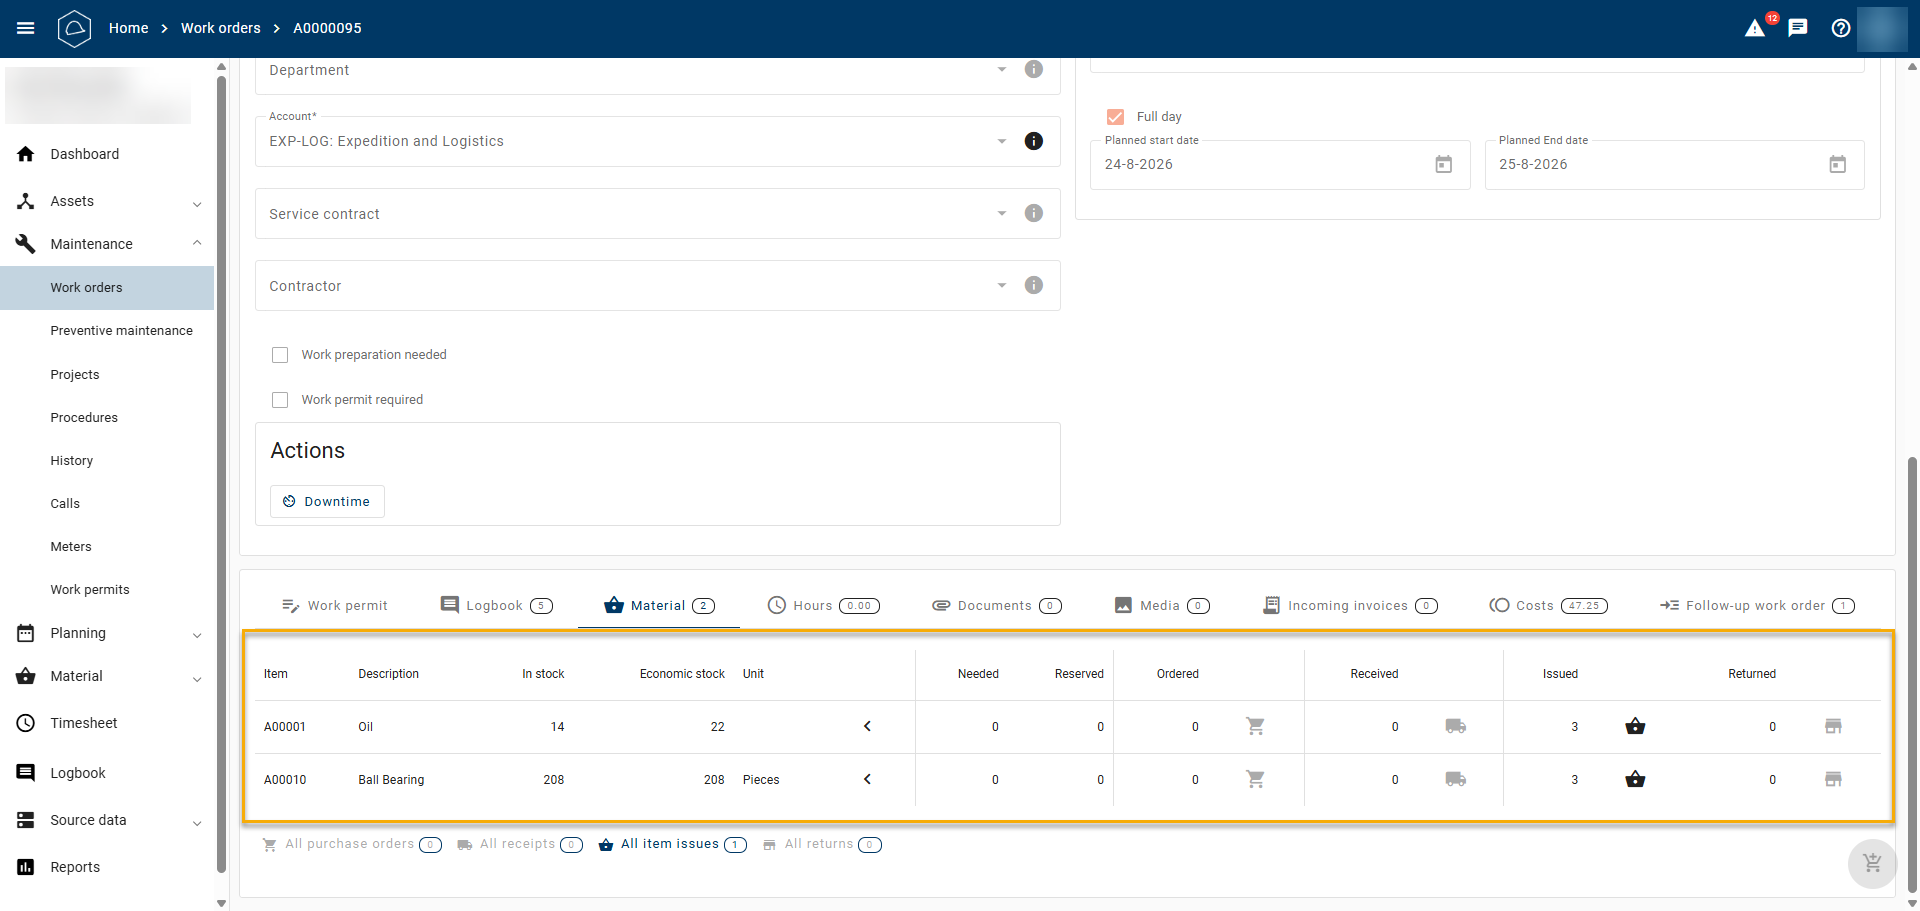
We can now see that these Items have been issued.
Image 12: An Item issue with Items
Step 6: Follow-up Work Order
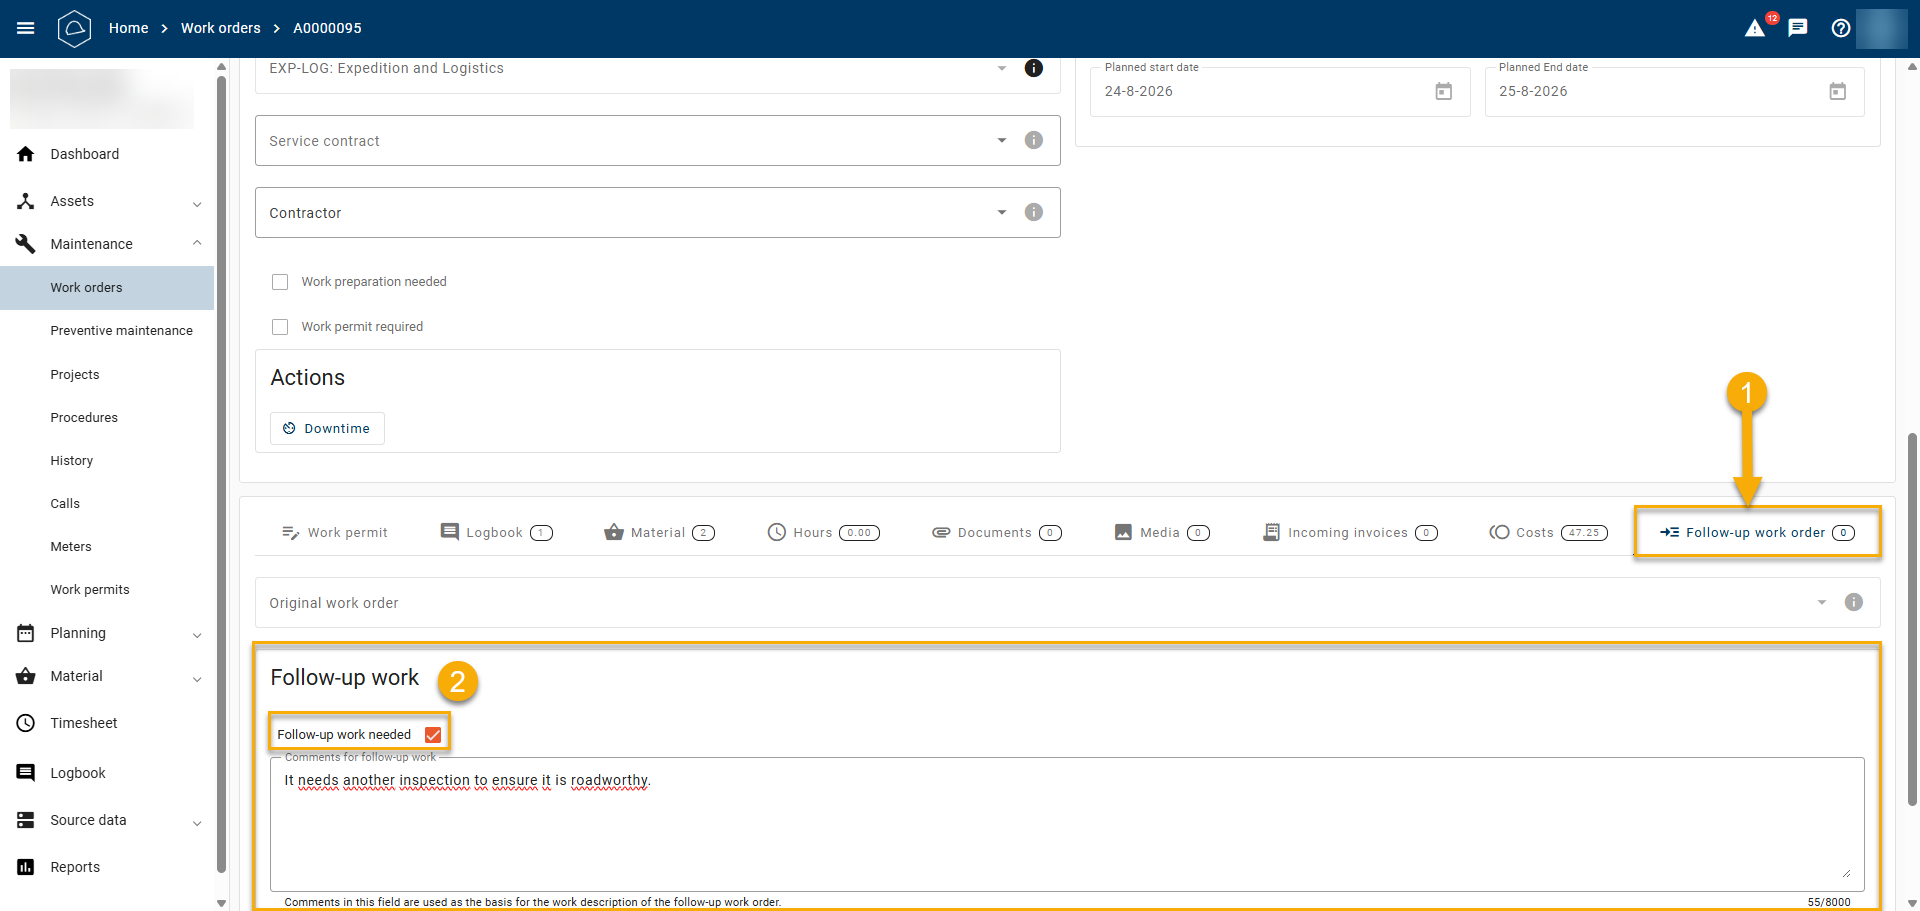
The work is then carried out, and the DAF appears to steer reasonably well again. An inspection will still be required to determine whether it is actually roadworthy, but this does not apply to this work order. In the bottom-right corner, go to Follow-up WO and indicate that follow-up work is required.
Image 13: 'Follow-up work required' on the 'Work Orders' page
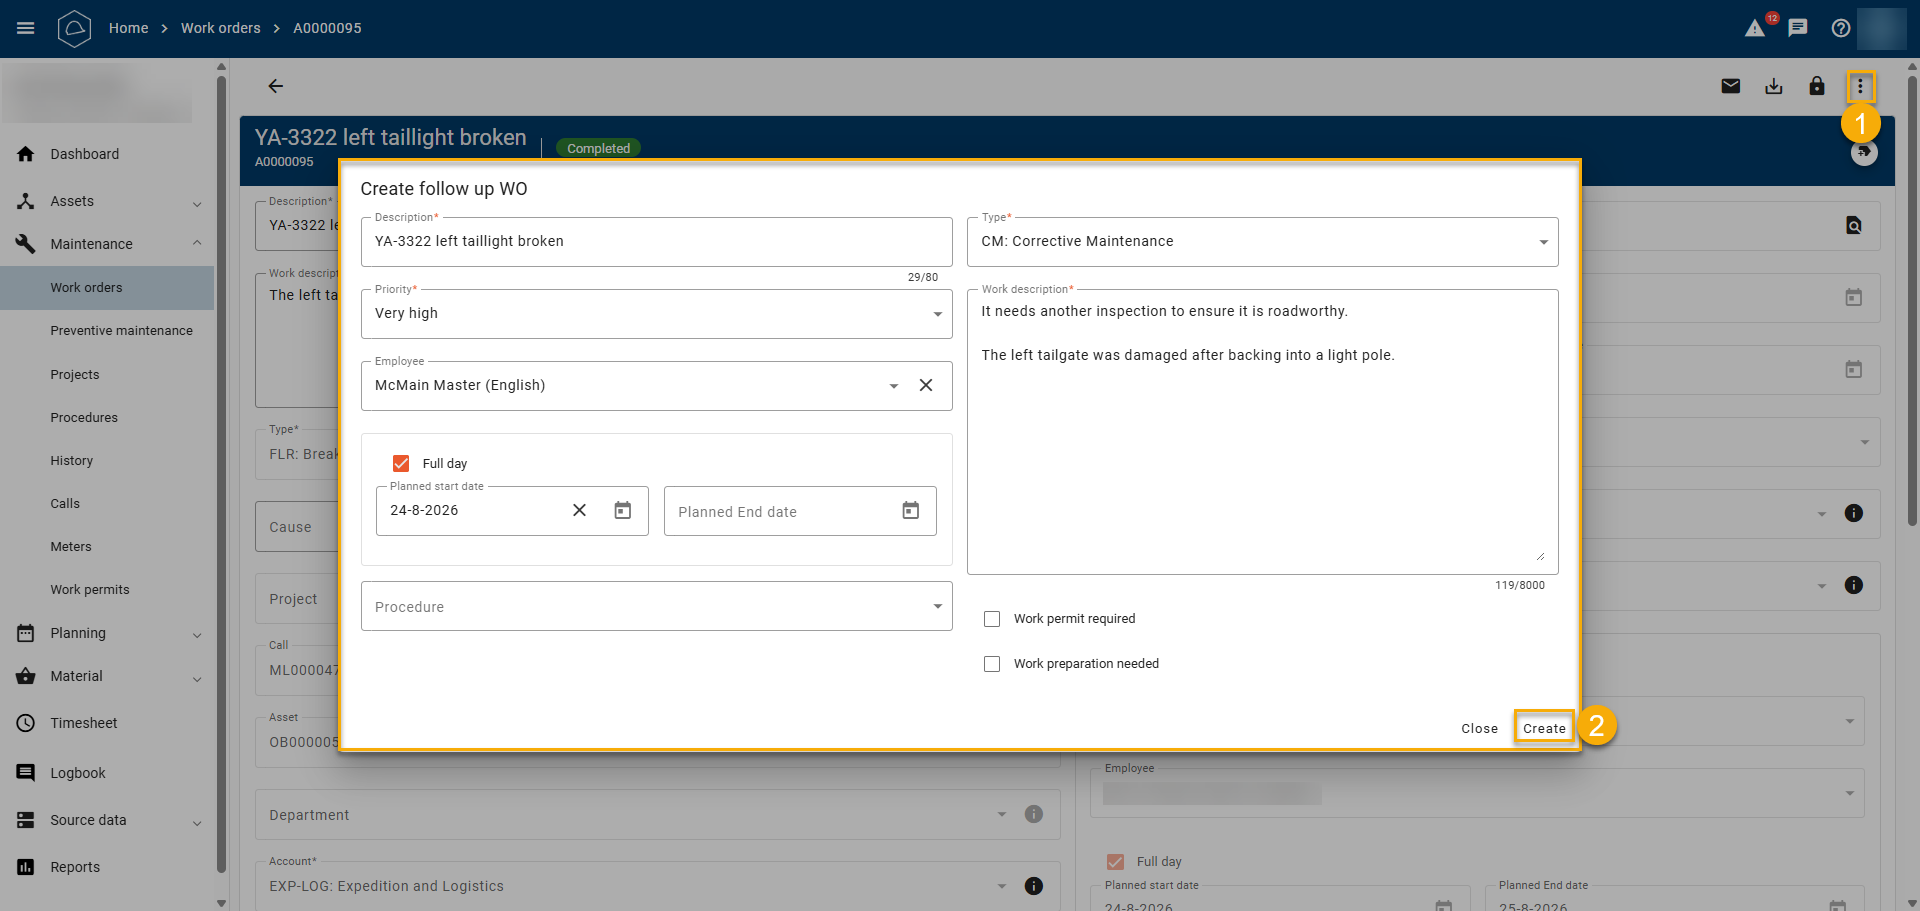
We create this WO immediately because we know the inspection will take place. Go to the three dots in the top-right corner and click Follow-up WO.
Image 14: Create a 'Follow-up WO' on a Work Order
This WO can be completed as a standard WO.
Step 7: Take the Asset out of service
During the inspection, it becomes clear that the repair to the DAF was insufficient and only provided a temporary improvement. The front axle is so severely damaged that it can no longer be repaired. Regrettably, the decision is made to dispose of the DAF, as there is no space to store it otherwise.
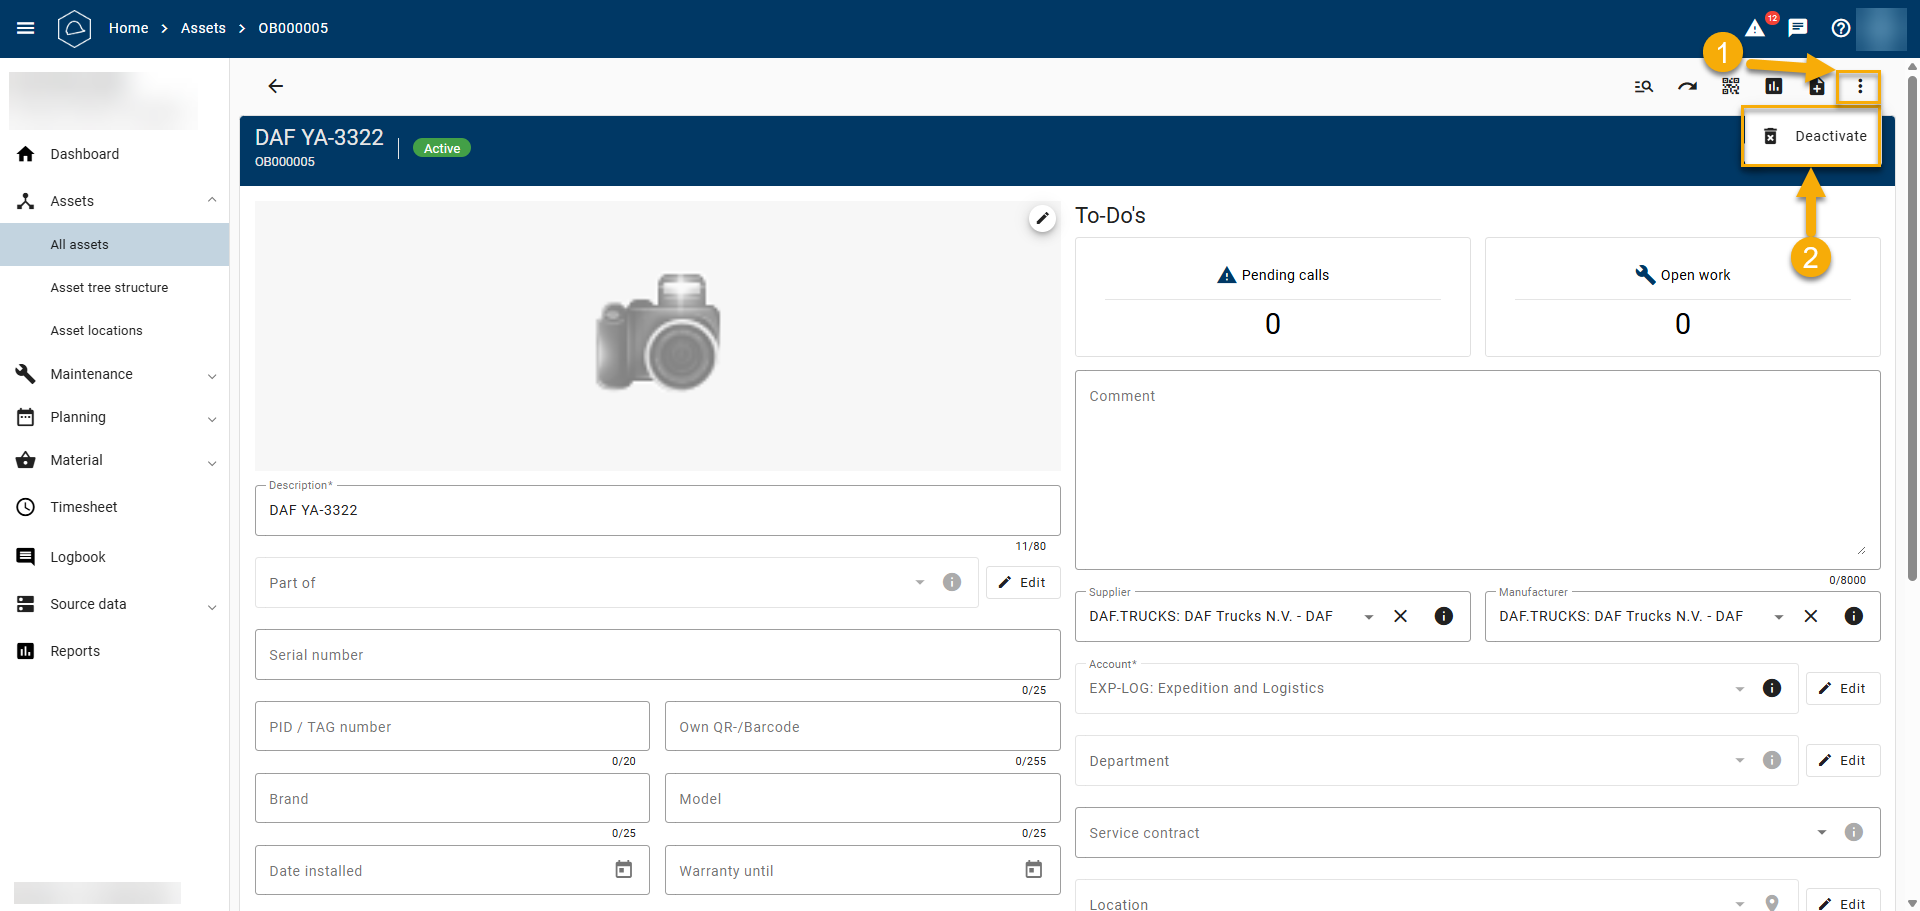
Go to the Asset and click the three dots in the top-right corner. Then click Take out of service.
Please note that all open WOs must be closed before this is possible!
Image 15: Deactivating an asset
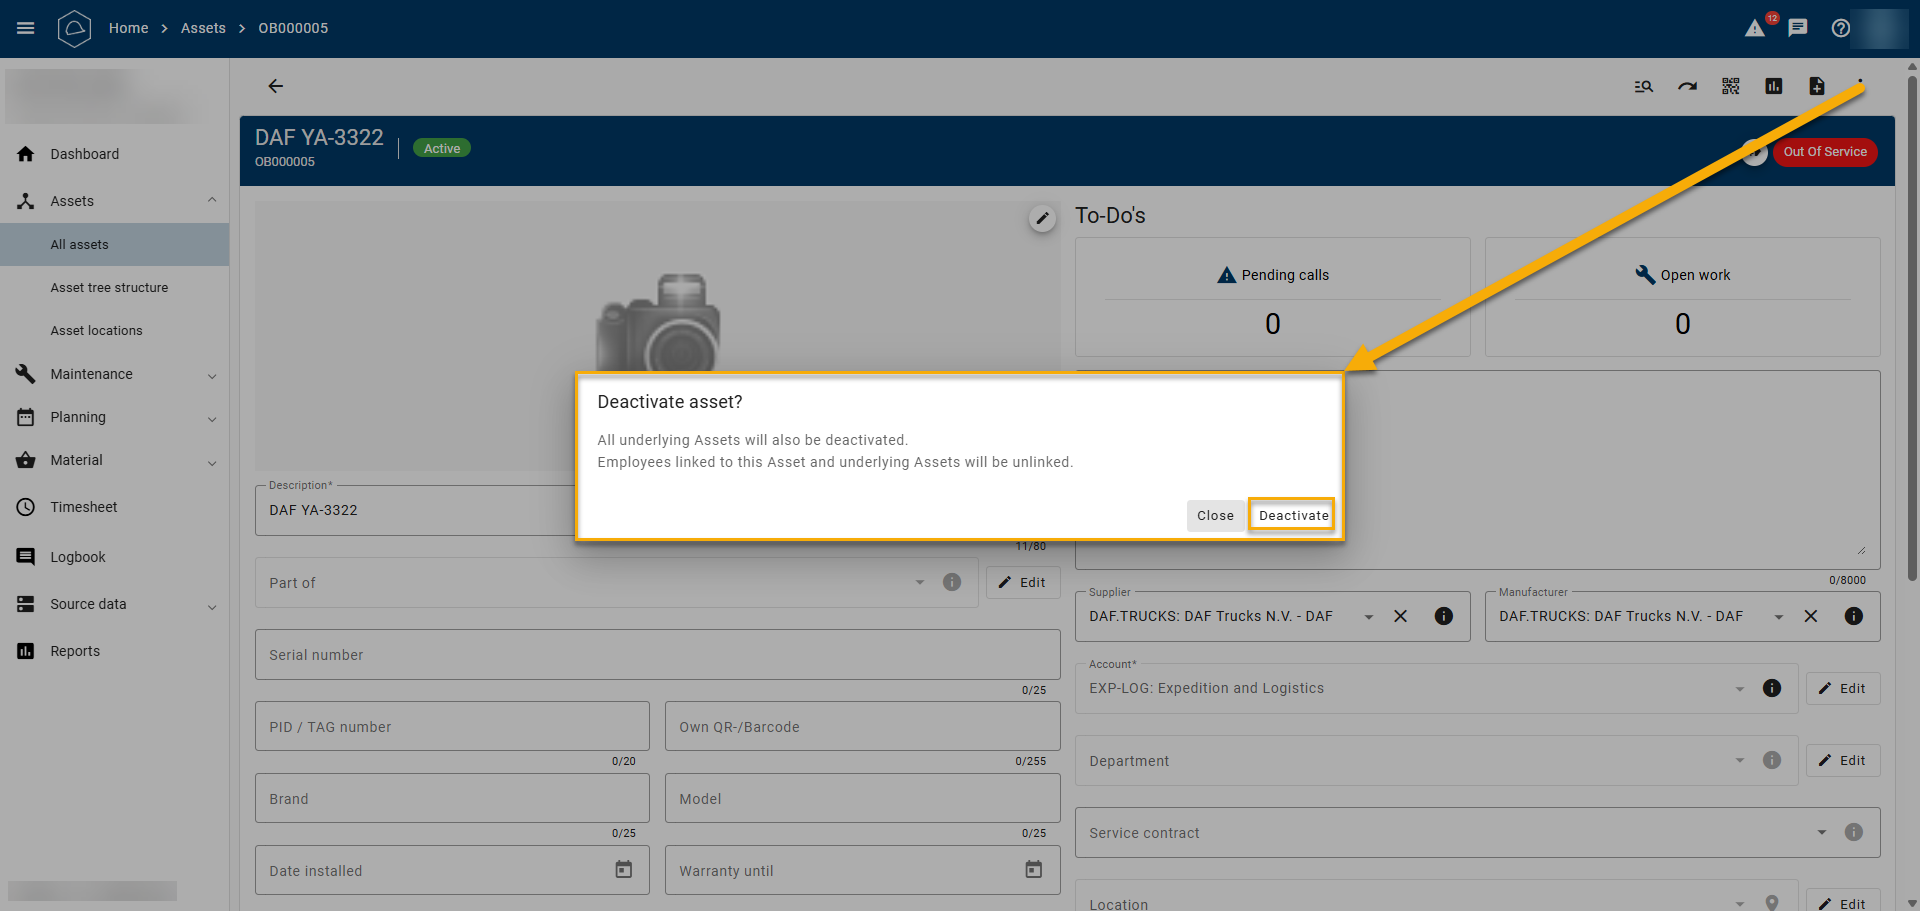
The DAF is now out of service and will no longer be displayed in asset menus unless specifically included using a filter.
Image 16: The 'Status' of the Asset
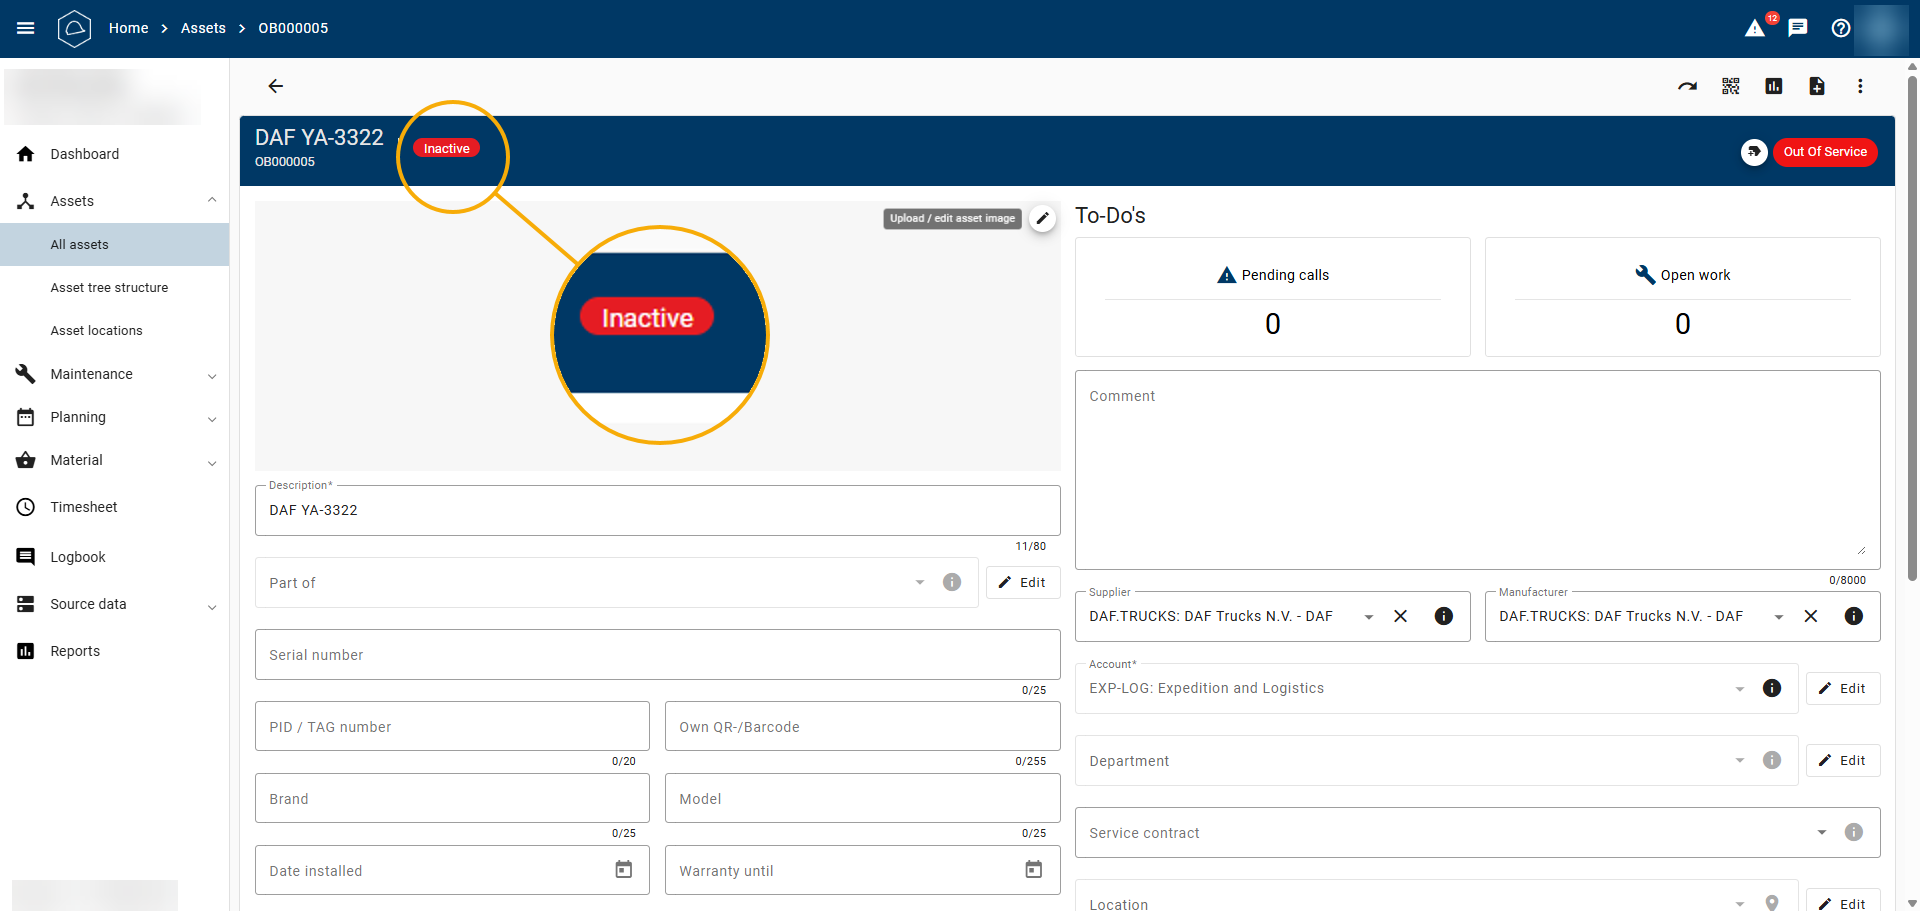
If this same DAF is later put back into service—for example, because it has been repaired after all—this action is reversible and can be performed in the same way as taking it out of service.
The Asset retains its complete history, regardless of whether it is Out of service or not, for administrative purposes and historical record keeping.